Content
Notebooks — View and manage data collection notebooks
Templates — View and manage reusable notebook templates
This guide is for IT staff, change management teams, and project administrators who need to manage users, teams, and notebooks in Fieldmark. It covers role assignment, access control, and common administrative workflows.
This guide is designed for:
Change management staff onboarding users and managing access
Project administrators setting up teams and notebooks
IT staff supporting Fieldmark deployments
If you’re looking to create notebooks or collect data, see the Quickstart Guide instead.
This guide covers:
Managing users at system, team, and notebook levels
Role assignment and access control
Common administrative workflows
This guide does not cover:
Template creation or management
Notebook design and form building (see Quickstart Guide)
Data collection and record management
API access and tokens
System configuration and Single Sign-On (SSO) setup
Before diving into procedures, here’s how management differs across the three areas:
Location |
How to Add User |
How to Add Role |
How to Change Role |
How to Remove |
|---|---|---|---|---|
Users (system) |
N/A (provisioned via SSO) |
Click “add” button in Roles column |
Click × on role badge, then add new role |
Click × on role badge (removes role only) |
Teams → Users |
Click “+ Add user” or go to Invites tab |
Click “+” on existing member’s row |
Click × on role badge, then add new role |
Click × on role badge (removes role only), or trash icon (removes user from team) |
Notebooks → Users |
Go to Invites tab |
N/A (one role per user) |
Remove user, then re-invite with desired role |
Click trash icon (removes user from notebook) |
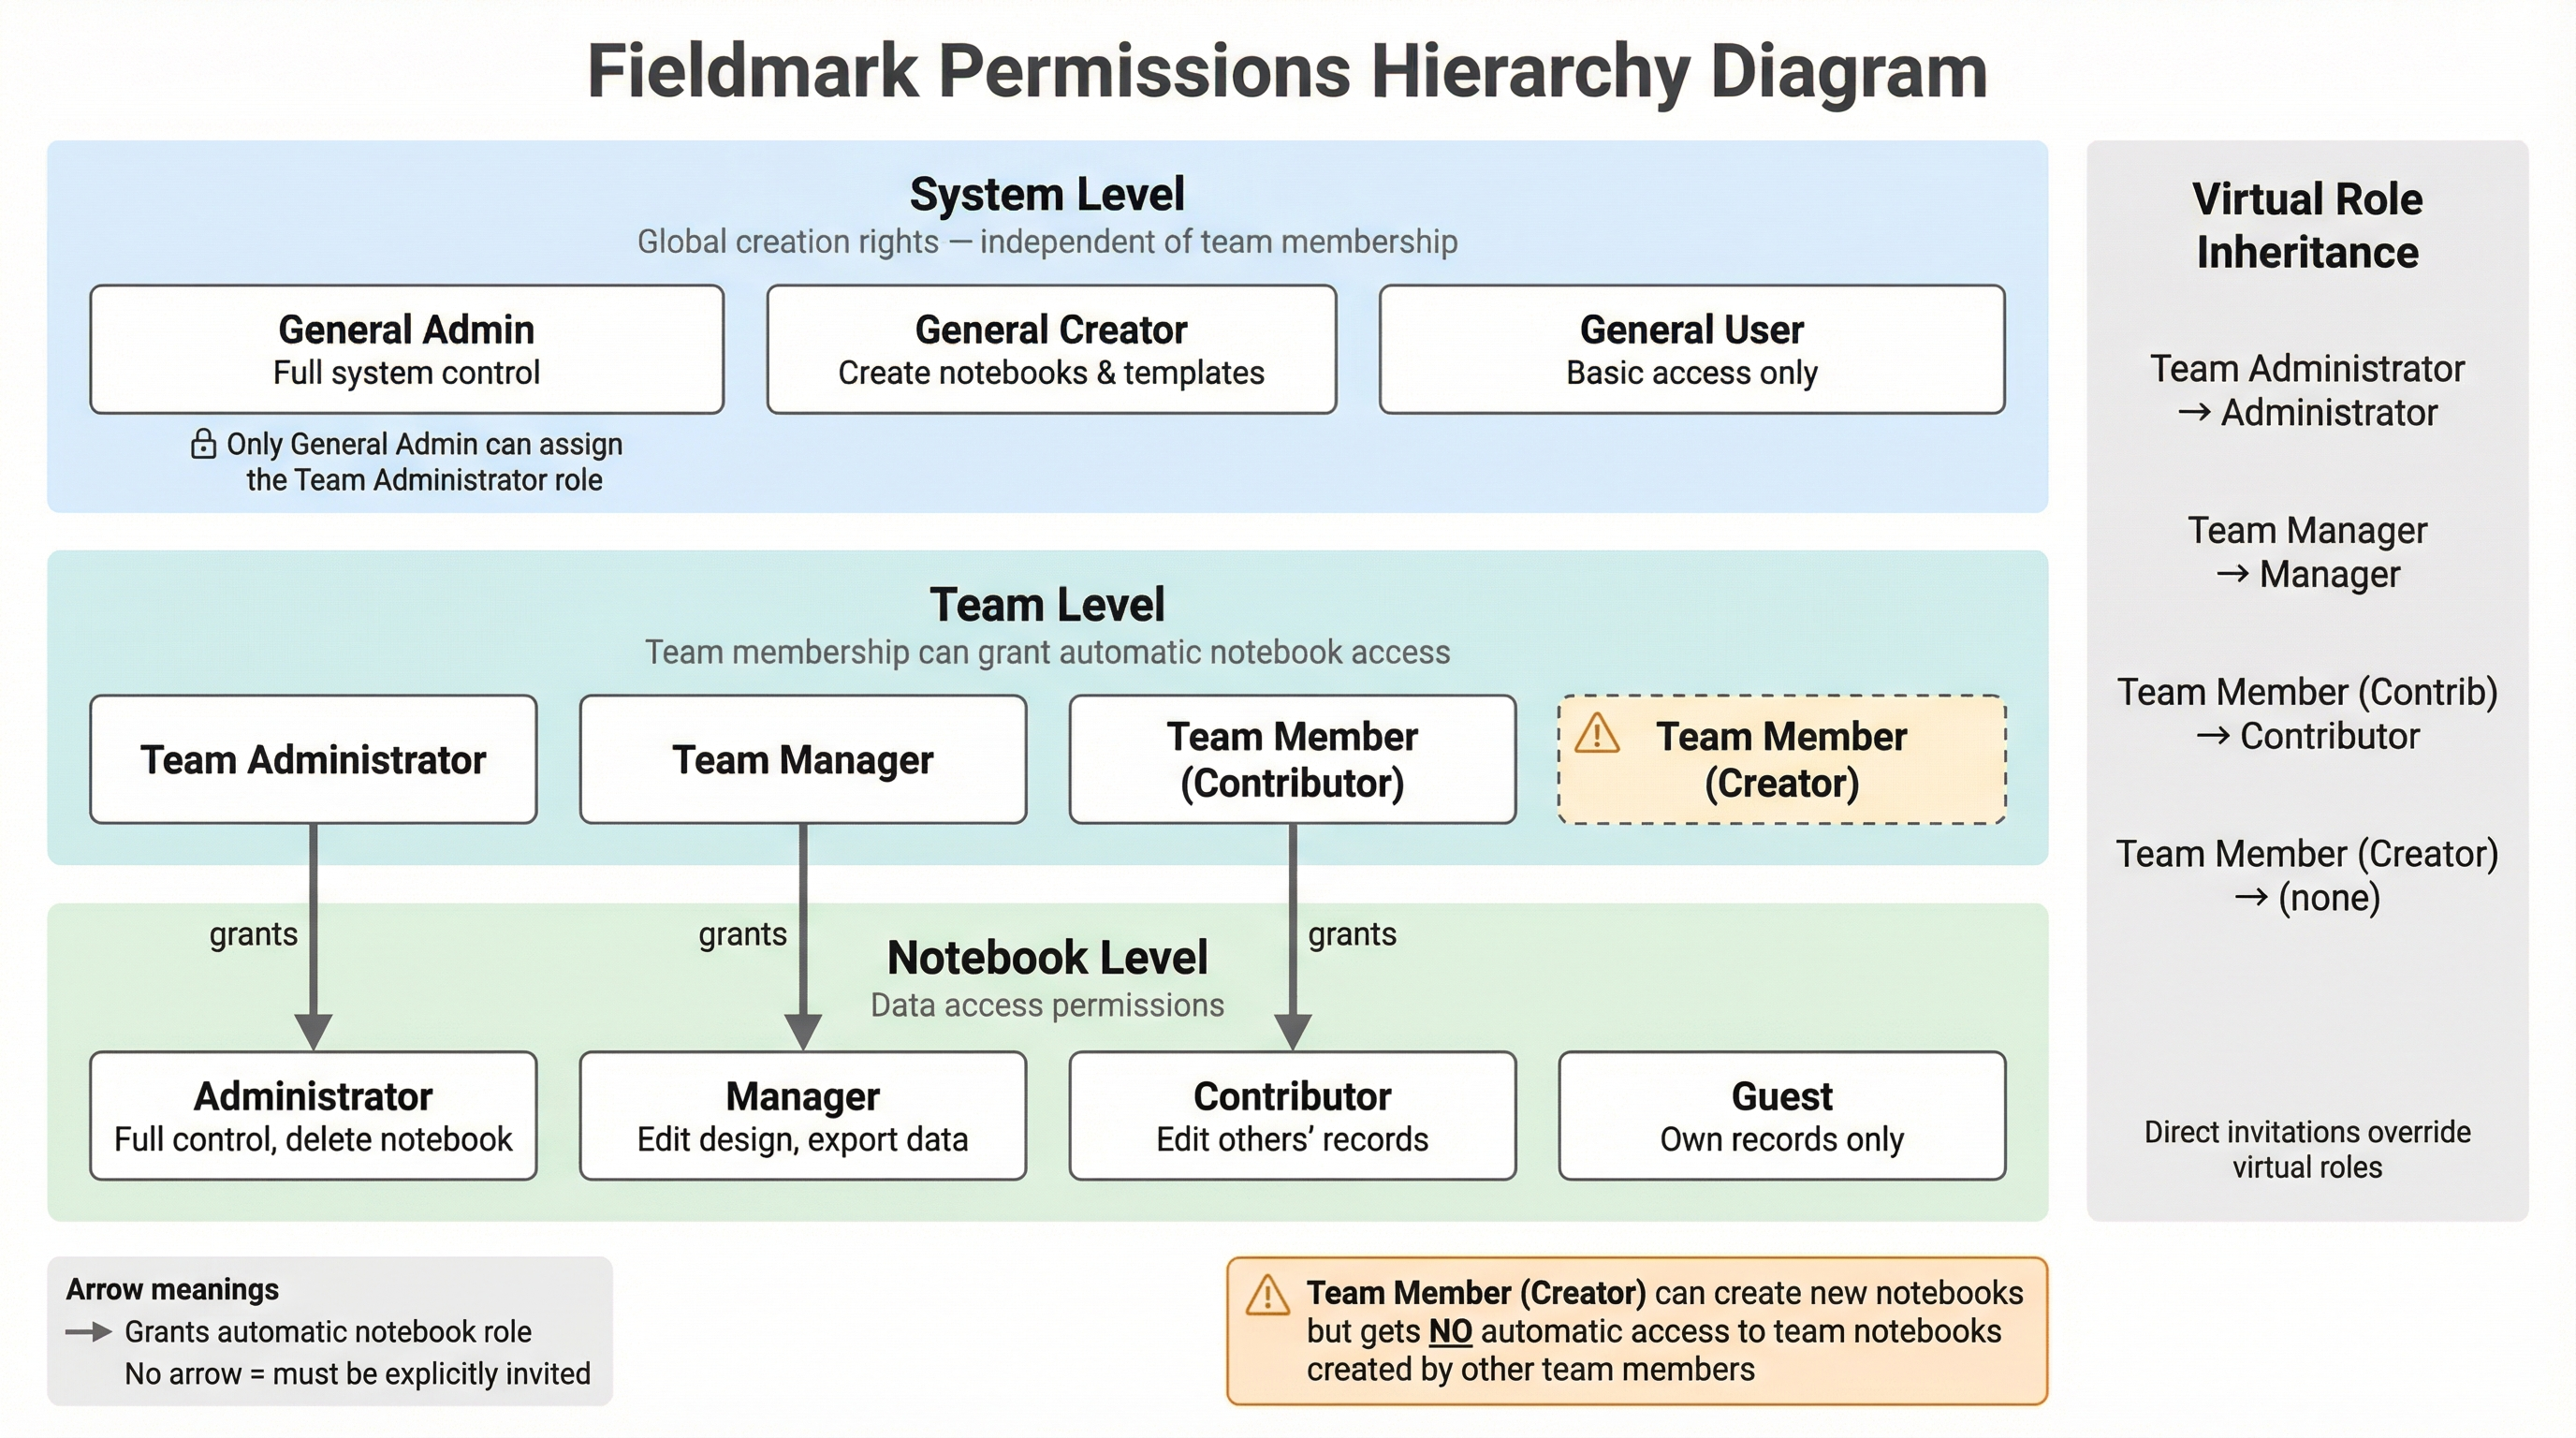
Fieldmark uses a role-based permissions system to control access to different functions and data. The model centres around access to resources: teams, user accounts, templates, notebooks, and the system as a whole.
Roles are assigned at three levels:
Level |
Controls |
|---|---|
System |
Global access and creation rights |
Team |
Access within a team and its resources |
Notebook |
Access to specific notebooks and records |
The nearby diagram shows roles at each level and how team roles automatically grant corresponding notebook access (virtual roles).
As IT or change management staff, you have been provisioned with:
GENERAL_ADMIN system role — full system control, with inherited Administrator access to all teams and notebooks
This means you can:
User management:
View all system users and their roles
Add or remove system roles (GENERAL_USER, GENERAL_CREATOR, GENERAL_ADMIN)
Reset user passwords (for non-SSO configurations)
Delete user accounts
Team management:
Create new teams
Access and manage all teams
Assign Team Administrator roles to others (only GENERAL_ADMIN can do this)
Notebook management:
Access and manage all notebooks
Edit or delete any notebook regardless of ownership
Note: If you cannot perform an action described in this guide, contact your system administrator to verify your role assignments.
When enterprise users sign in via SSO, they are provisioned with:
GENERAL_CREATOR system role — they can create notebooks and templates
Team Administrator of their assigned team — they have full control over their team
This means they can immediately:
Create notebooks (stand-alone or within their team)
Invite users to their team and assign team roles
Invite users to notebooks they administer and assign notebook roles
Manage and update roles for their team members
Note: Users do not have the necessary privileges to create their own teams. Teams are typically created during initial provisioning or by a GENERAL_ADMIN, and users are assigned as Team Administrator of their team.
The most restricted access level is GENERAL_USER, which can:
List notebooks they have access to
List templates they have access to
GENERAL_USERs have to be granted access to a notebook directly (via notebook invite) or through relevant team membership to view or use it.
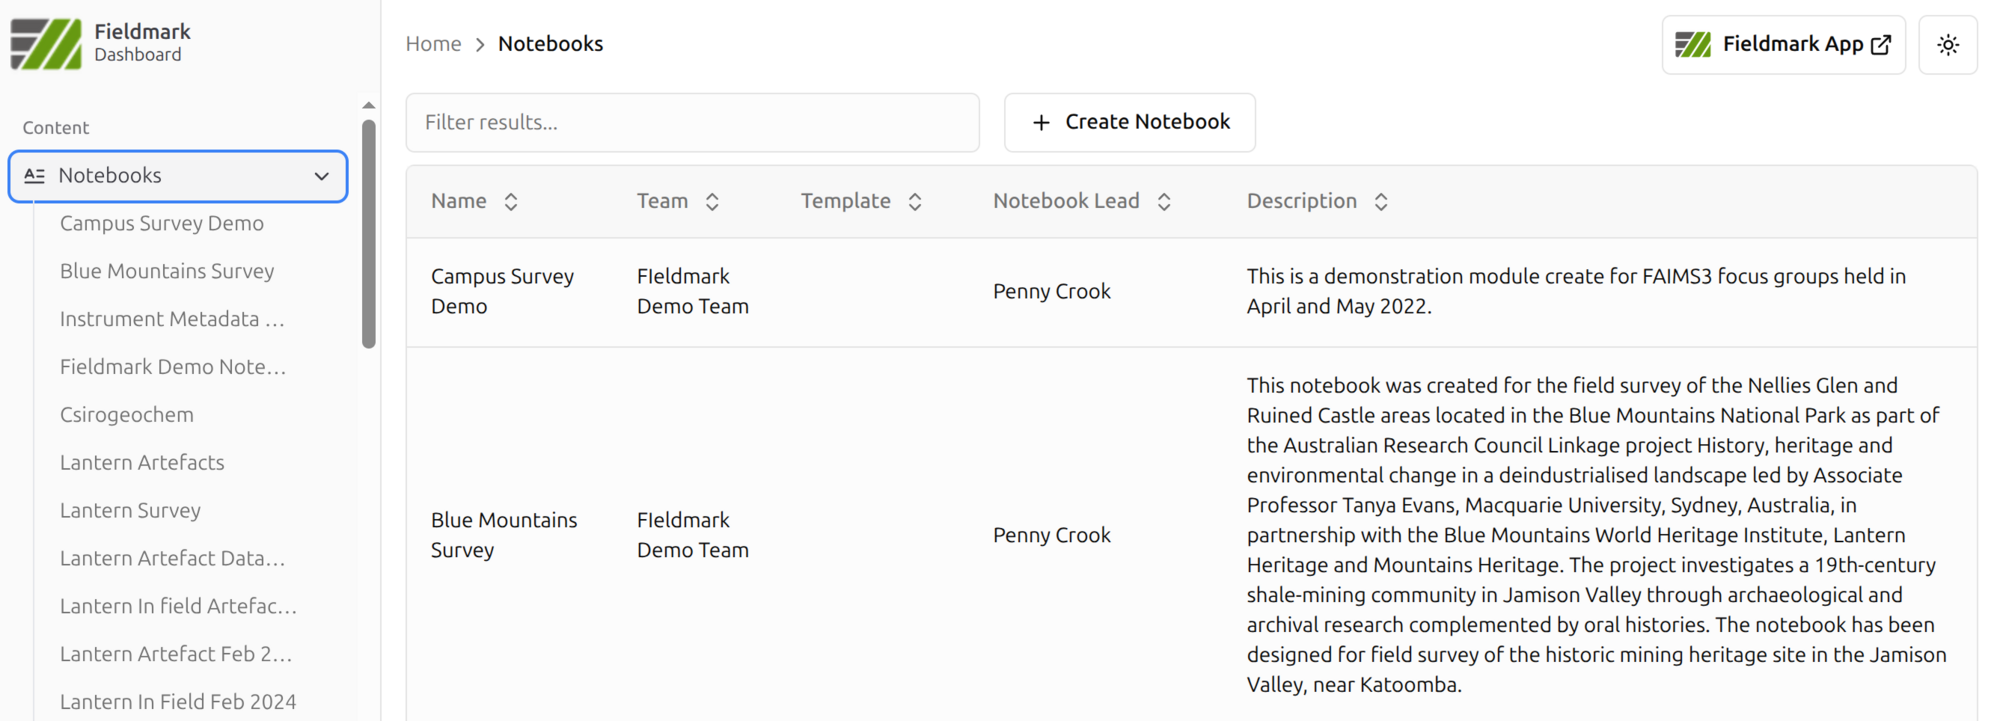
When you log in to the Fieldmark Dashboard, you’ll see a left sidebar with two sections:
Notebooks — View and manage data collection notebooks
Templates — View and manage reusable notebook templates
Users — View all system users and their roles (requires appropriate permissions)
Teams — View and manage teams
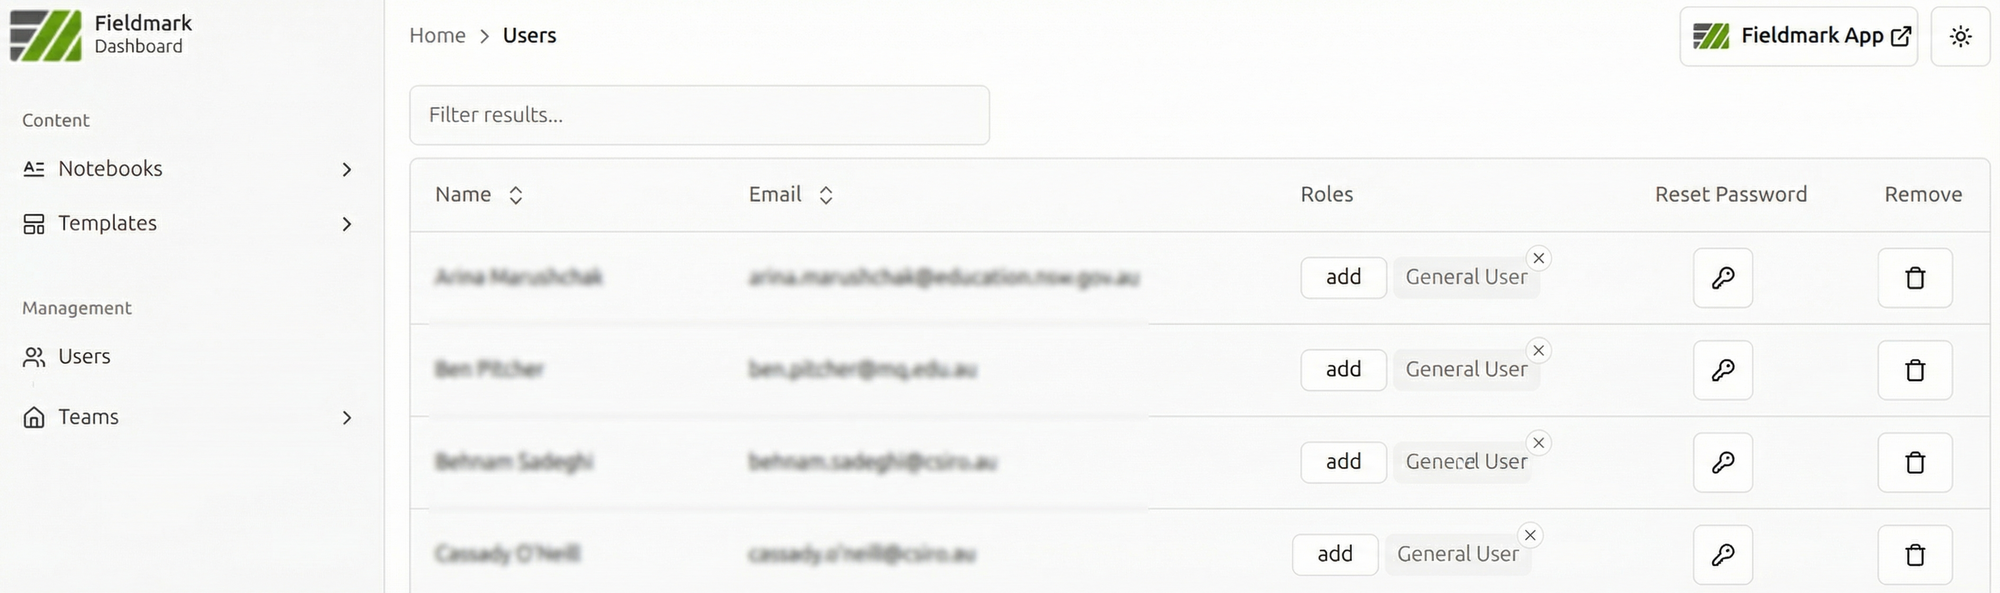
Tip: Click on any sidebar item to navigate to that section. The breadcrumb at the top (e.g., “Home > Users”) shows your current location.
The Users section shows all users in the system with their email addresses and system-level roles.
In an enterprise deployment, users are automatically created when they first sign in via SSO. You cannot manually create user accounts through the Dashboard. When a user signs in for the first time, they are provisioned with default roles (see “What Typical Users Can Do By Default” above).
Click Users in the left sidebar (under Management)
You’ll see a table with columns:
Name — User’s display name
Email — User’s email address
Roles — System roles with “add” button and role badges
Reset Password — Not applicable for SSO deployments; password management is handled through your institution’s identity provider
Remove — Remove user from system
The screenshot above shows this view, with the sidebar navigation on the left and the Users table in the main content area.
There are three system roles: General User (basic access), General Creator (can create notebooks and templates), and General Admin (full system control). For detailed permissions, see Roles Reference → System-Wide Roles below.
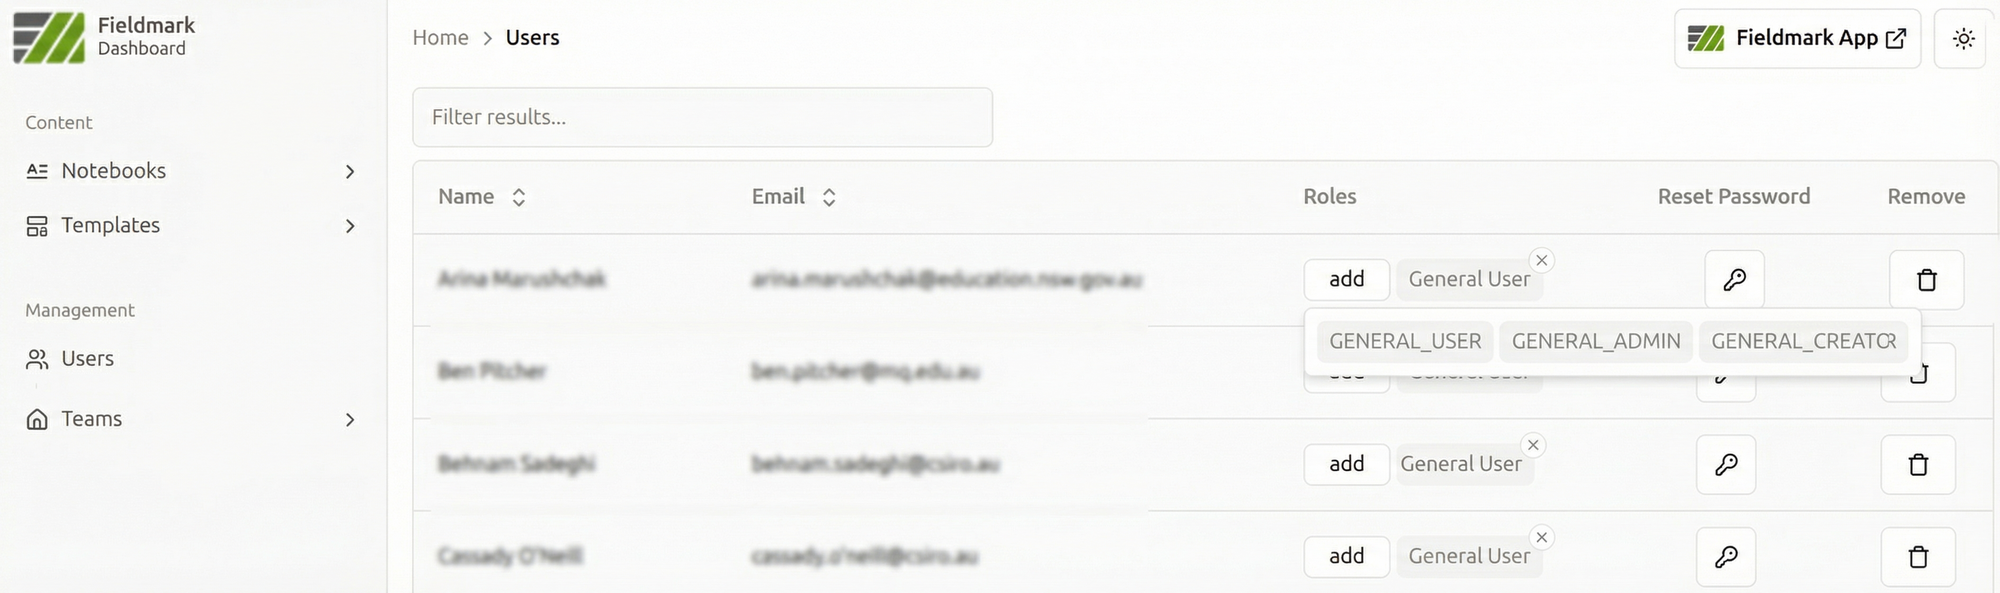
Find the user in the Users list
In the Roles column, click the add button
Select the role to add from the dropdown
The new role badge appears next to any existing roles
Find the user in the Users list
In the Roles column, locate the role badge you want to remove
Click the × in the upper-right corner of the role badge
The role is removed immediately
Each role badge (visible in the Dashboard screenshot earlier) has a small × in the upper-right corner — click this to remove the role.
⚠️ Warning: Be careful when removing roles. If you remove GENERAL_CREATOR from a user, they will no longer be able to create notebooks globally. However, they can still create notebooks within teams where they have the Team Member (Creator), Team Manager, or Team Administrator role.
See also: Troubleshooting → Can’t Assign Team Administrator Role
Teams group users together and provide shared access to notebooks. When you navigate to a team, you’ll see several tabs.
Only users with the GENERAL_ADMIN system role can create new teams.
Click Teams in the left sidebar
Click the + Create Team button
Enter the team details:
Name — A descriptive name for the team
Description — Optional description of the team’s purpose
Click Create
The new team appears in the Teams list

After creating a team, you’ll typically want to add members and assign a Team Administrator (see “Adding a User to Your Team” below).
Note: Most teams are created during initial provisioning. You’ll usually be managing existing teams rather than creating new ones.
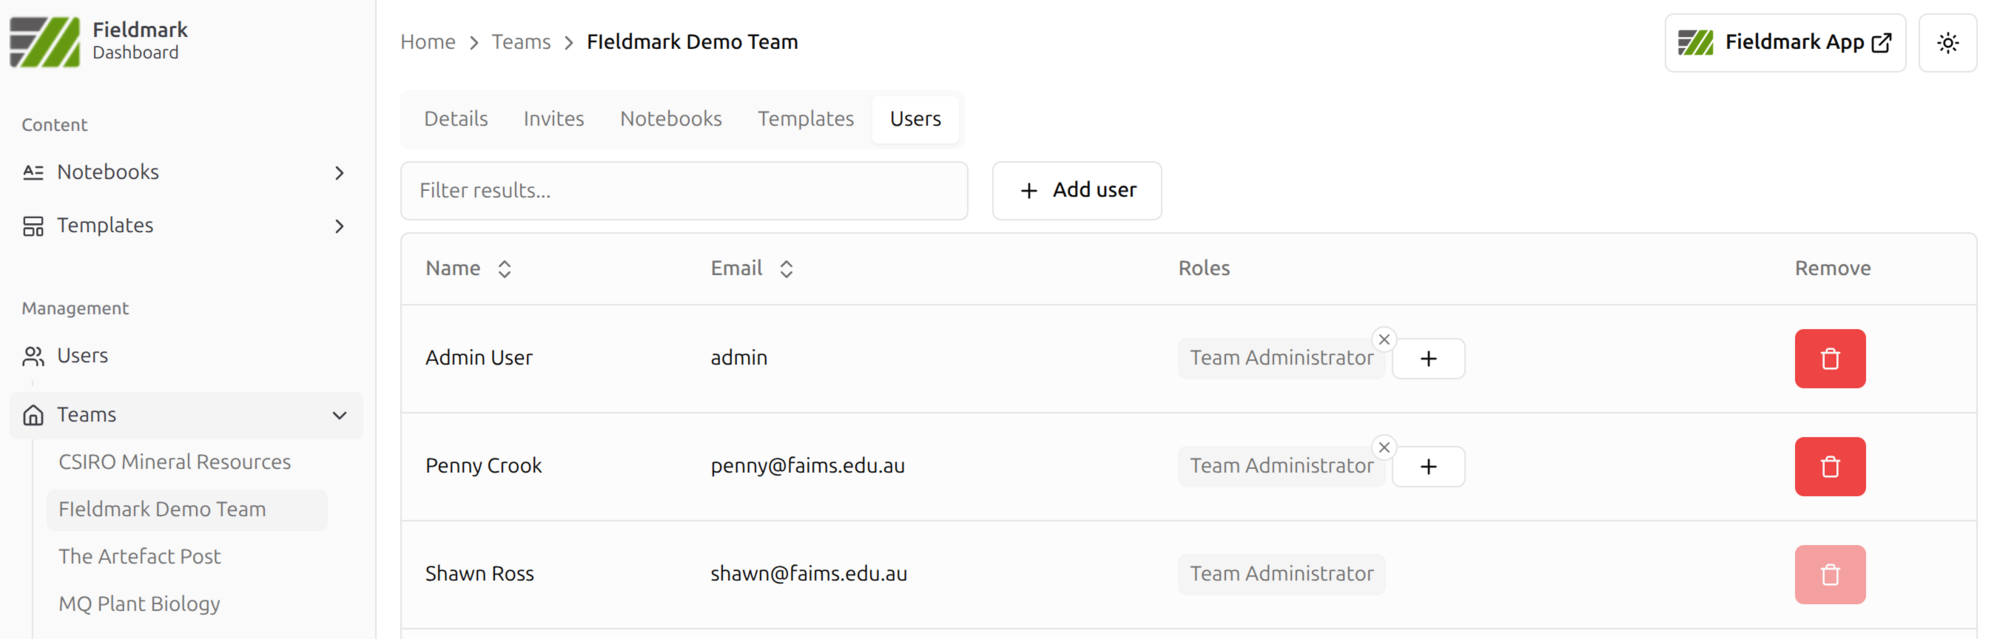
Click Teams in the left sidebar
Click on your team name (teams you administer appear in the expanded sidebar)
You’ll see tabs: Details, Invites, Notebooks, Templates, Users

Tab |
Purpose |
|---|---|
Details |
Team name and description |
Invites |
Pending invitations to join the team |
Notebooks |
Notebooks associated with this team |
Templates |
Templates owned by this team |
Users |
Current team members and their roles |
Navigate to your team
Click the Users tab
You’ll see a table with columns:
Name — Member’s display name
Email — Member’s email address
Roles — Team role badges with + to add roles
Remove — Red trash icon to remove member
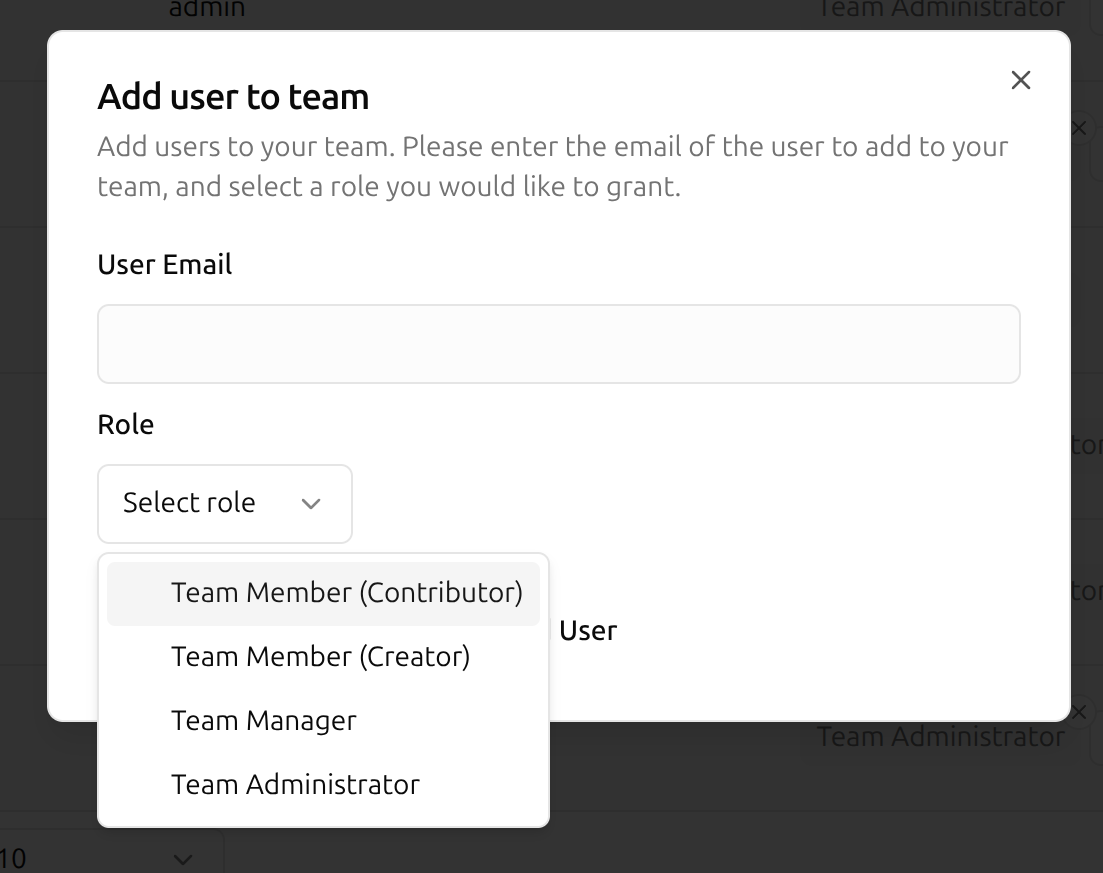
There are four team roles: Team Administrator (full control), Team Manager (manage members, create notebooks), Team Member (Contributor) (access team resources), and Team Member (Creator) (create notebooks only). Team roles automatically grant corresponding notebook access — see the permissions diagram in the Introduction or Roles Reference → Team Roles below for details.
⚠️ Important: Team Member (Creator) can create notebooks but does NOT get automatic access to existing team notebooks. This role is often used for student or citizen science projects, where it is undesirable for the user to have access to other peoples’ notebooks.
Navigate to your team → Users tab
Click + Add user button above the table
Enter the user’s email address
Select their team role from the dropdown
Click Add
Navigate to your team → Users tab
Find the member in the list
In the Roles column, click the + button
Select the additional role
The new role badge appears
Navigate to your team → Users tab
Find the member in the list
In the Roles column, click the × on the role badge you want to remove
Navigate to your team → Users tab
Find the member in the list
Click the red trash icon in the Remove column
Confirm removal when prompted
The screenshot in the “Viewing Team Members” section above shows the red trash icons in the Remove column.
⚠️ Warning: Removing someone from a team removes their automatic (virtual) access to ALL team notebooks. If they have direct notebook roles, that access persists until separately removed.
The Invites tab allows you to create invitation links that users can use to join your team.
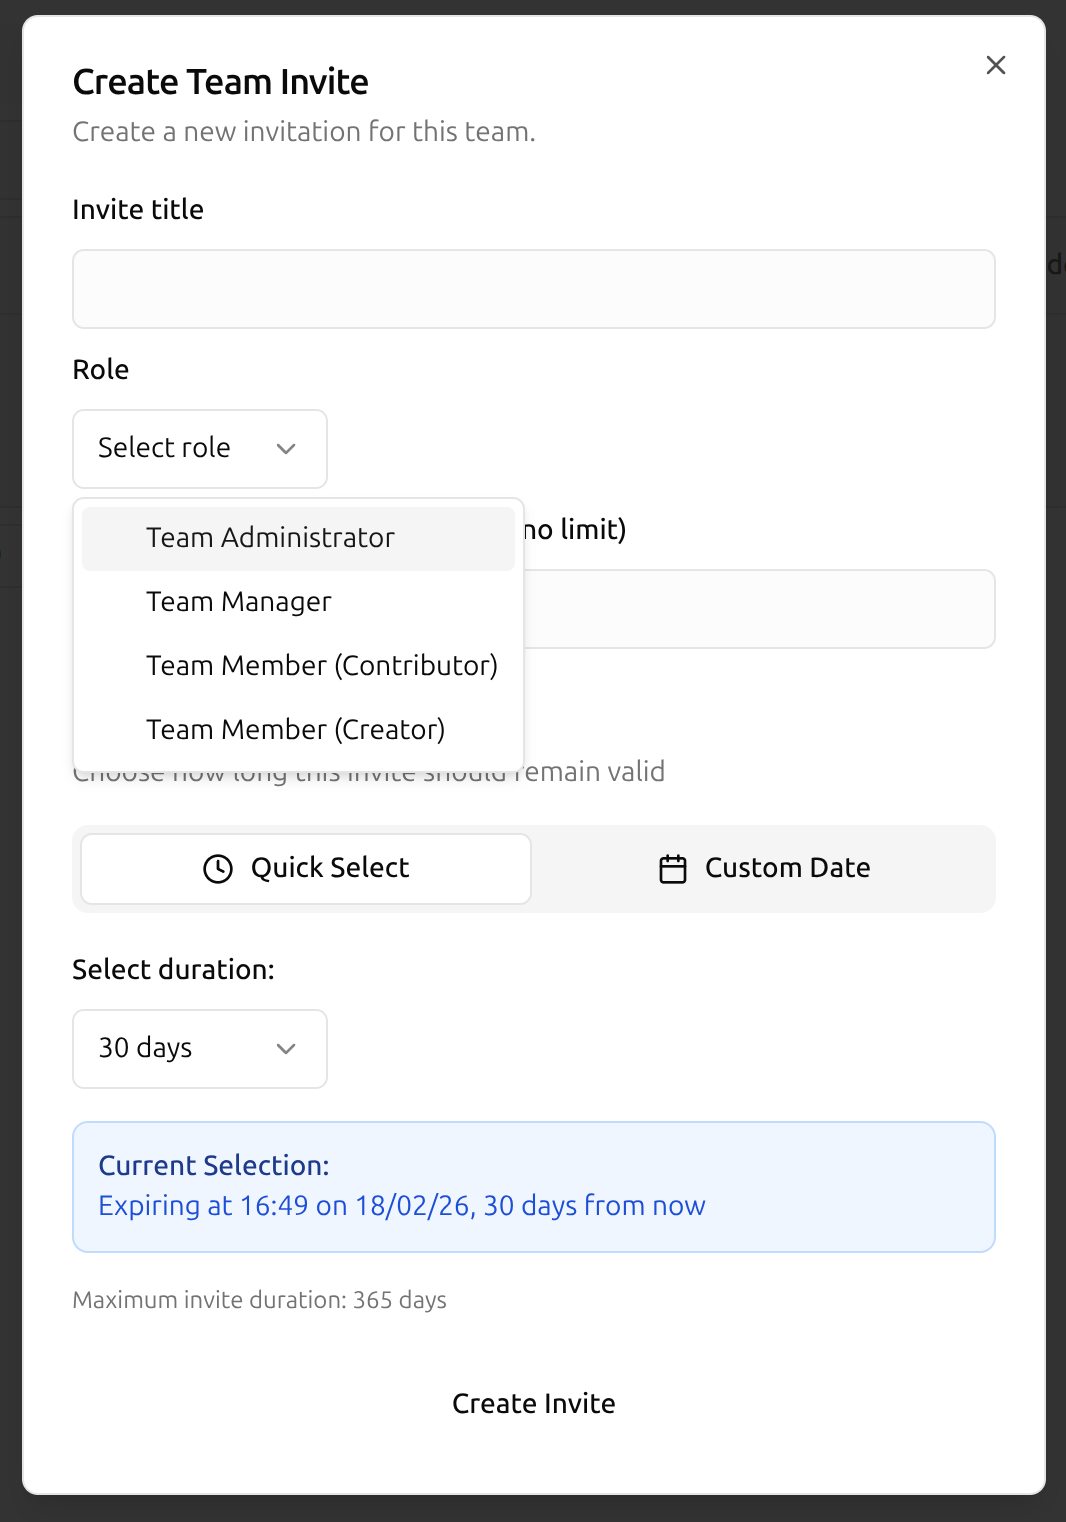
Navigate to your team
Click the Invites tab
Click + Create Invite
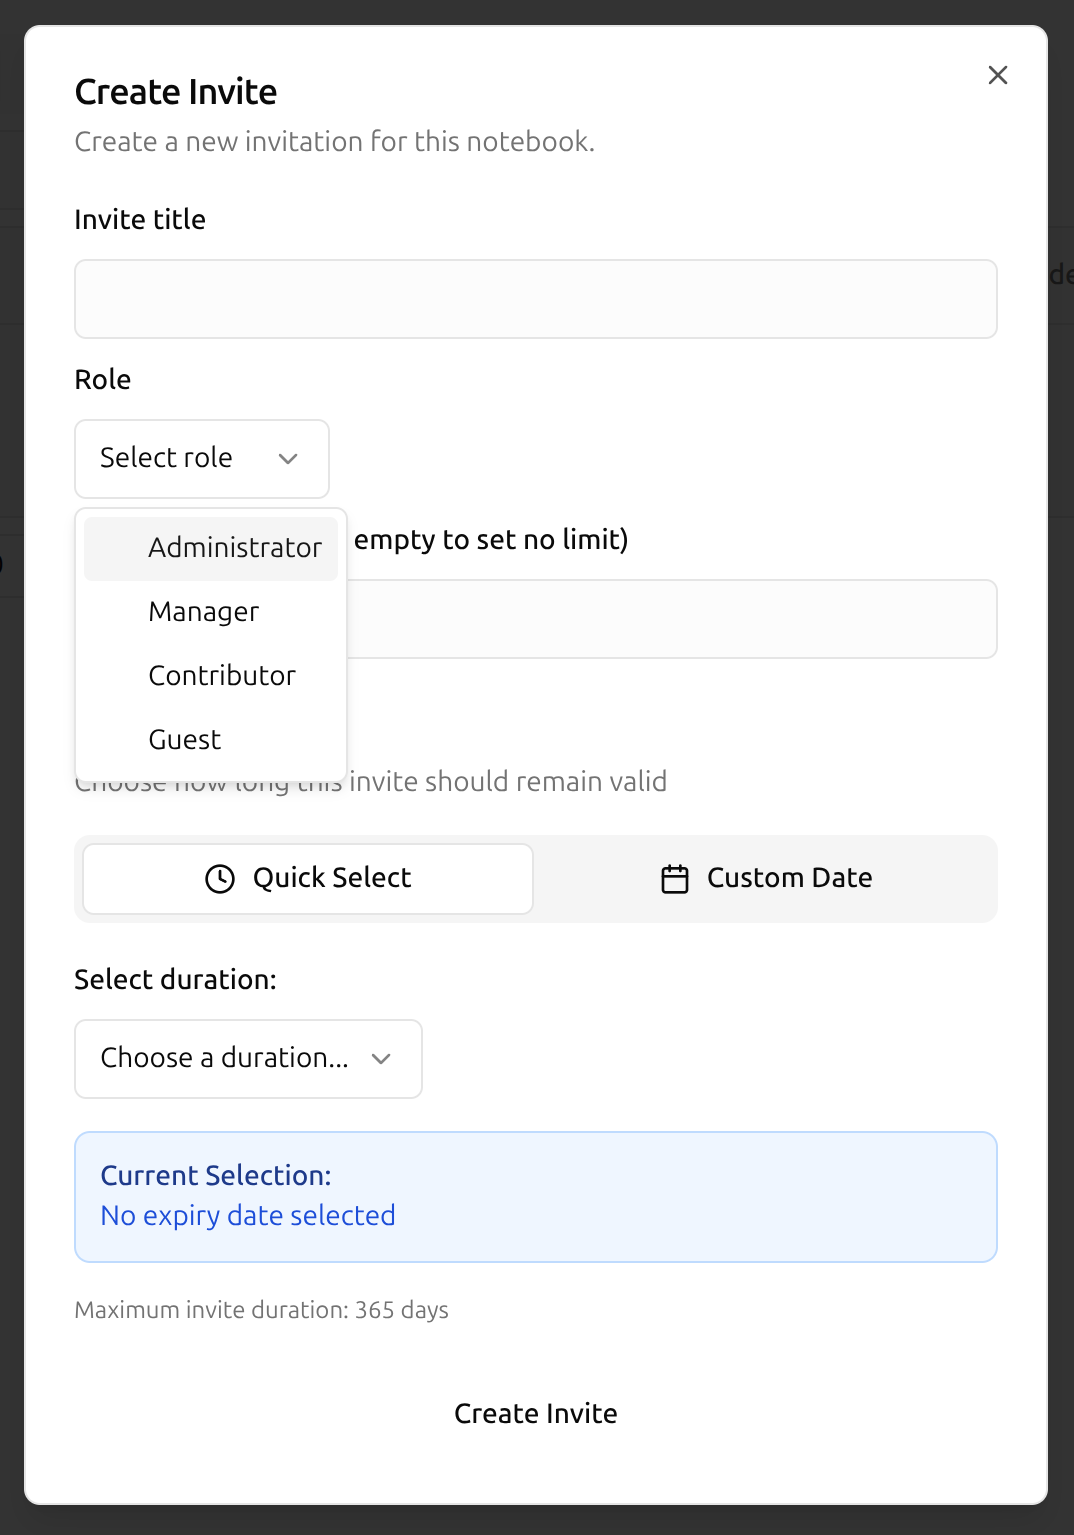
Configure the invitation:
Role — The team role new members will receive
Expiry — When the invitation expires (see below)
Uses — How many times the invite can be used (optional)
Click Create Invite
Option |
Description |
|---|---|
Expiry |
The date/time after which the invite link no longer works. Expired invites cannot be extended — create a new one instead. |
Uses remaining |
Limits how many people can use this invite. Use multi-use invites for workshops or group onboarding. Leave unlimited (default) for open invitations. |
Code |
A short code users can enter manually |
Link |
A URL that users can click to accept the invitation |
QR Code |
Scannable code for mobile devices — useful for in-person onboarding |
The Invites tab shows all active invitations with their status.
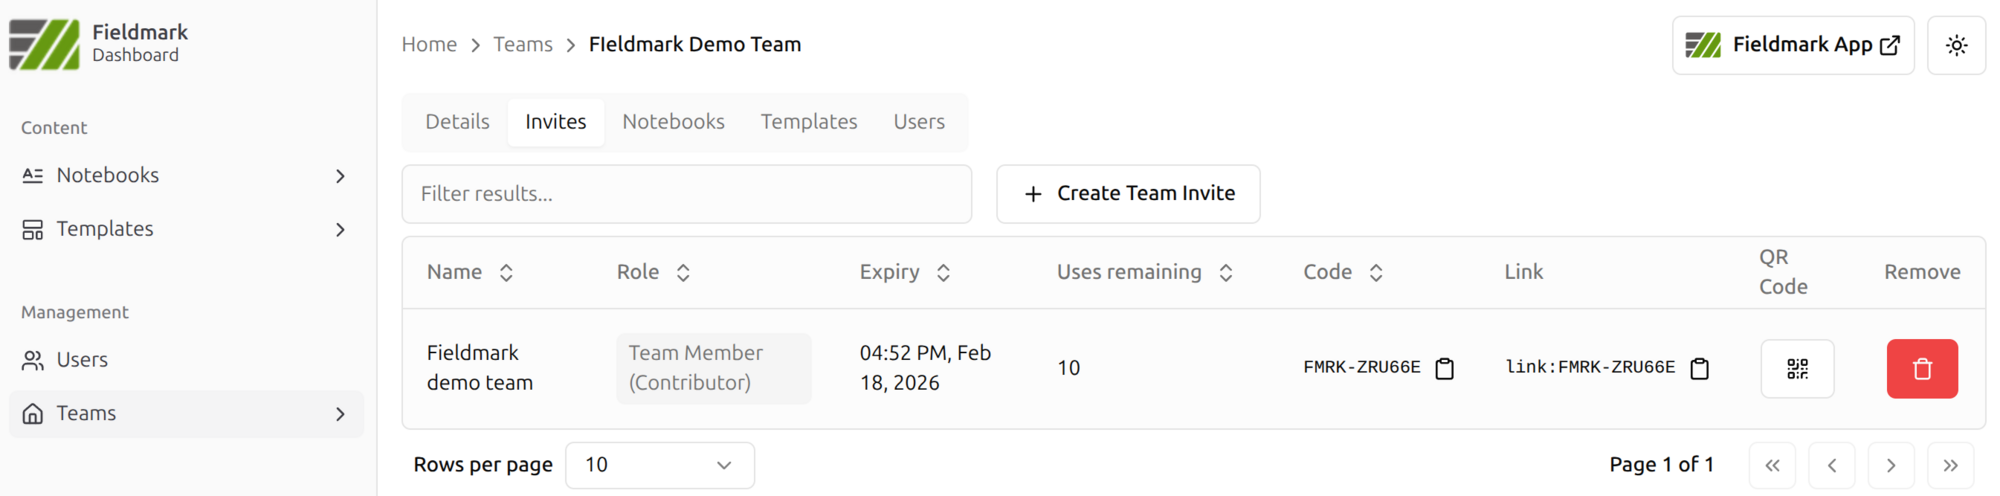
From here you can:
See how many uses remain on each invite
Check expiry dates
Remove invites that are no longer needed (click the trash icon)
See also:
Managing Notebook Users → Inviting Users to a Notebook (similar process)
Troubleshooting → Can’t Add Users to Team
Troubleshooting → User Has Access But Shouldn’t
Notebooks have their own user management, separate from teams. Users can access notebooks either through team membership (virtual roles) or direct assignment.
Click Notebooks in the left sidebar
Click on a notebook name
Click the Users tab
You’ll see a table with columns:
Name — User’s display name
Email — User’s email address
Notebook Roles — Current role (display only)
Remove — Trash icon to remove user
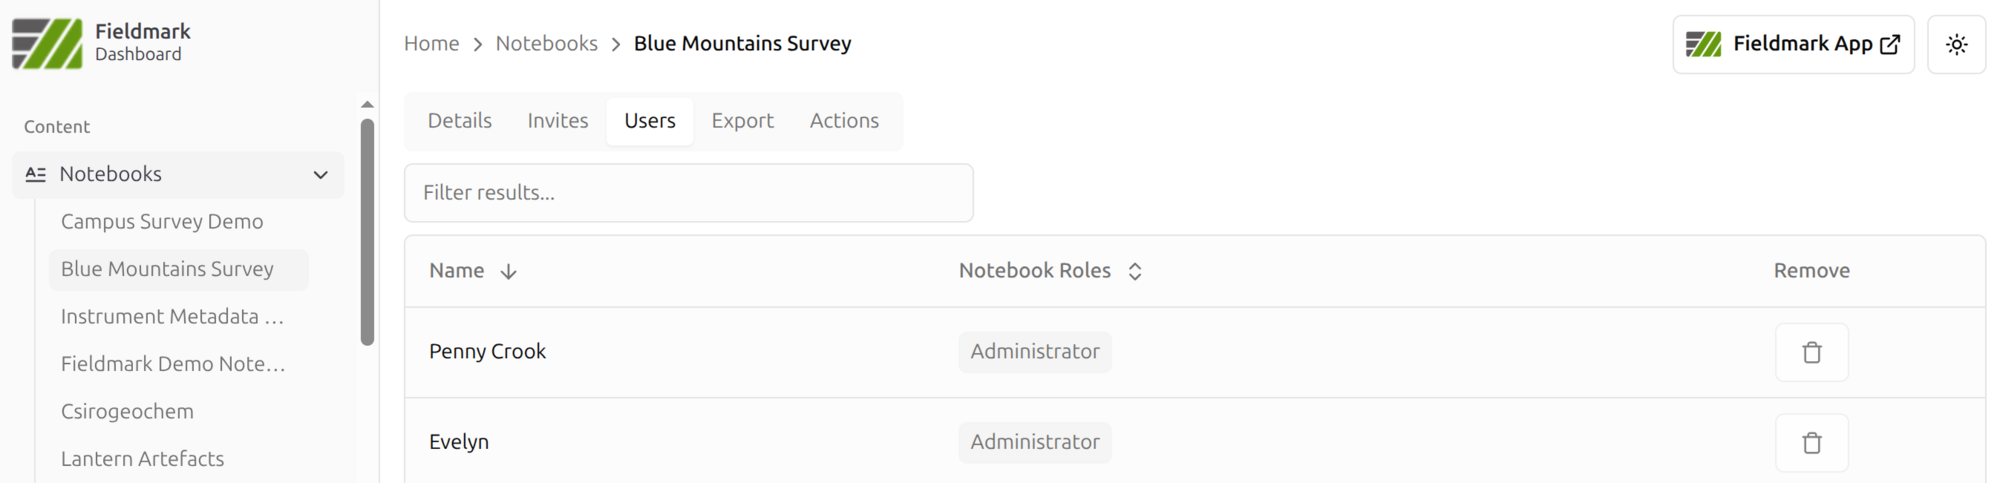
There are four notebook roles: Administrator (full control, can delete notebook), Manager (edit design, export, manage access), Contributor (edit others’ records), and Guest (own records only). For detailed permissions, see Roles Reference → Notebook Roles and the Permission Matrix below.
Users can have notebook access from two sources:
Virtual roles — Automatic access from team membership (see the permissions diagram in the Introduction for the mapping)
Direct roles — Explicitly assigned to this notebook via invitation
Note: Direct roles override virtual roles. If a Team Member (Contributor) is directly assigned as Guest on a specific notebook, they have Guest access to that notebook.
Unlike Teams and Users, you cannot change roles directly in the notebook Users tab. To add users or change roles:
Navigate to your notebook
Click the Invites tab
Click + Invite user (or similar button)
Enter the user’s email address
Select their notebook role (Administrator, Manager, Contributor, or Guest)
Send the invitation
Once created, invitations appear in the Invites tab where you can manage them:
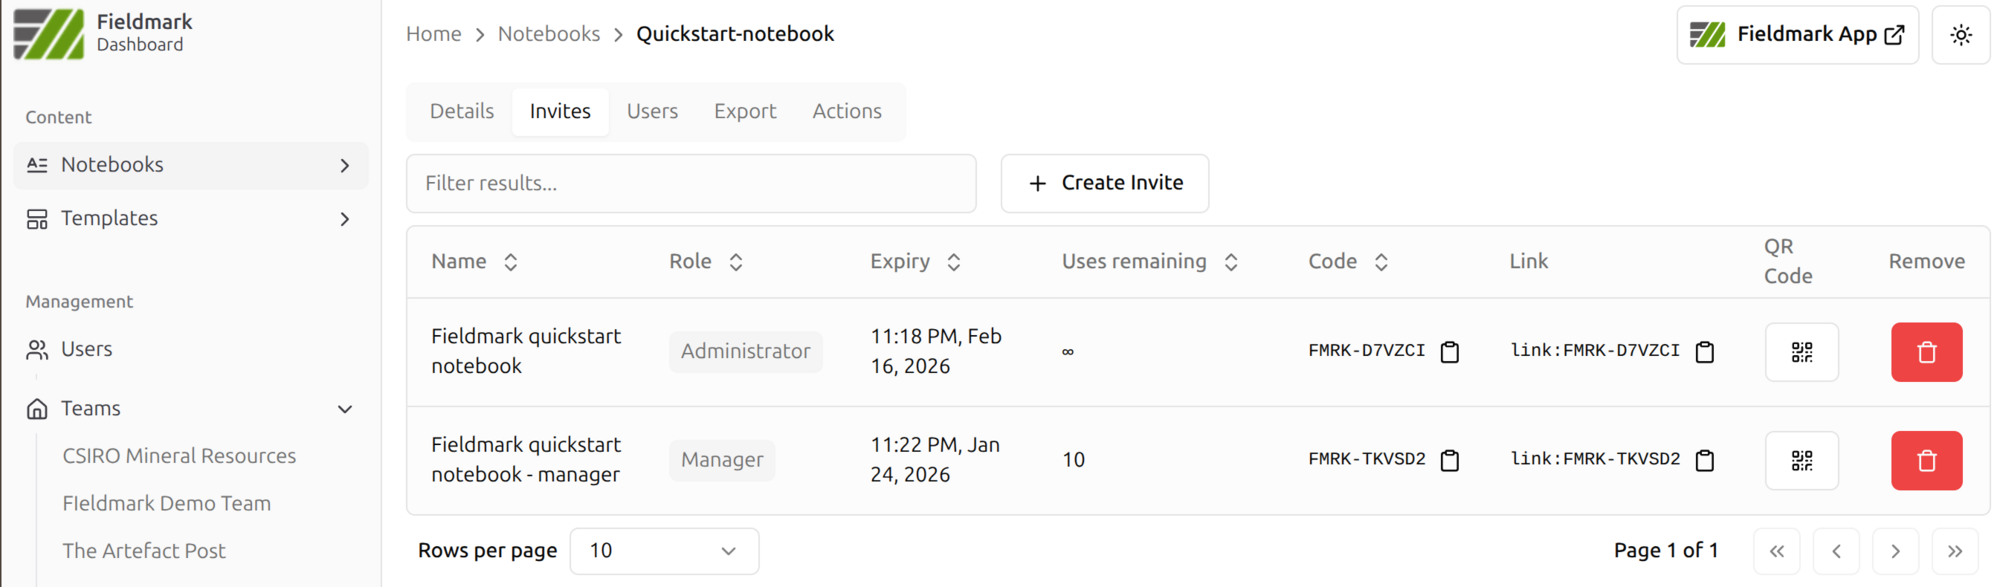
The Invites tab shows:
Column |
Description |
|---|---|
Name |
The invitation title/description |
Role |
The notebook role recipients will receive |
Expiry |
When the invite expires — create a new invite if one expires |
Uses remaining |
How many more people can use this invite |
Code |
Short code for manual entry |
Link |
Clickable URL to share |
QR Code |
Scannable code for mobile onboarding |
Tip: Use multi-use invites with QR codes for field team onboarding sessions. Each team member can scan the same code to join with the appropriate role.
Navigate to the notebook → Users tab
Find the user in the list
Click the trash icon in the Remove column
Confirm removal
Note: Removing a direct role doesn’t remove team membership. If the user has a team role, they’ll still have virtual access through the team.
To hand off a notebook to someone else:
Go to the notebook → Invites tab
Invite the new owner with Administrator role
Once they accept, they have full control
Optionally remove yourself via the Users tab
⚠️ Warning: Always ensure at least one Administrator remains on every notebook.
See also:
Troubleshooting → Can’t See a Notebook
Troubleshooting → Can’t Change a User’s Notebook Role
Scenario |
Recommended Role |
|---|---|
Project lead who manages everything |
Team Administrator + notebook Administrator |
Researcher who designs forms |
Team Manager or notebook Manager |
Field worker collecting data |
Team Member (Contributor) or notebook Contributor |
External reviewer (limited access) |
Notebook Guest |
Someone who creates notebooks but shouldn’t see others’ data |
Team Member (Creator) |
They sign in via SSO (automatically get GENERAL_CREATOR + their own team)
Navigate to your team → Users tab → + Add user
Enter their email and select Team Member (Contributor)
They now have Contributor access to all your team’s notebooks
Create notebook(s) for the project (Notebooks → Create Notebook)
Ensure notebooks are associated with your team
Add team members with appropriate roles:
Project lead: Team Manager or Team Administrator
Researchers: Team Member (Contributor)
External collaborators: Invite directly to specific notebooks
Option A — Add to team (ongoing access):
Add them to your team as Team Member (Contributor)
They get virtual access to all team notebooks
Option B — Notebook only (limited scope):
Go to the specific notebook → Invites tab
Invite them with Contributor or Guest role
They don’t need team membership
Notebook → Invites tab → Invite colleague as Administrator
Verify they can access and manage the notebook
Optionally remove yourself from the Users tab
Remove from notebooks (if they have direct roles):
Navigate to each notebook → Users tab → trash icon
Remove from team:
Navigate to team → Users tab → red trash icon
Note: You cannot revoke system roles — contact a GENERAL_ADMIN
Role |
Display Name |
Description |
Typical User |
|---|---|---|---|
GENERAL_USER |
General User |
View assigned resources, manage own tokens |
Rarely used alone |
GENERAL_CREATOR |
General Creator |
Create notebooks and templates globally |
Researchers, project managers |
GENERAL_ADMIN |
General Admin |
Full system control, manage all users |
IT administrators |
Role |
Display Name |
Permissions |
Virtual Notebook Role |
|---|---|---|---|
TEAM_ADMIN |
Team Administrator |
Full team control |
Administrator |
TEAM_MANAGER |
Team Manager |
Manage members, create notebooks |
Manager |
TEAM_MEMBER |
Team Member (Contributor) |
Access team resources |
Contributor |
TEAM_MEMBER_CREATOR |
Team Member (Creator) |
Create notebooks only |
None (no access to other team notebooks) |
⚠️ Key restriction: Only GENERAL_ADMIN can assign Team Administrator role. Team Member (Creator) cannot see other team notebooks — they must be explicitly invited.
Role |
Display Name |
Permissions |
|---|---|---|
PROJECT_ADMIN |
Administrator |
Full control, manage administrators, delete notebook |
PROJECT_MANAGER |
Manager |
Edit design, close notebook, reassign team, export, manage invites/access |
PROJECT_CONTRIBUTOR |
Contributor |
Edit others’ records (plus all Guest permissions) |
PROJECT_GUEST |
Guest |
Activate notebook, create records, view/edit/delete own records |
Action |
Guest |
Contributor |
Manager |
Administrator |
|---|---|---|---|---|
Activate notebook |
✅ |
✅ |
✅ |
✅ |
Create records |
✅ |
✅ |
✅ |
✅ |
View/edit/delete own records |
✅ |
✅ |
✅ |
✅ |
Edit others’ records |
❌ |
✅ |
✅ |
✅ |
Update notebook metadata/design |
❌ |
❌ |
✅ |
✅ |
Close notebook |
❌ |
❌ |
✅ |
✅ |
Reassign to different team |
❌ |
❌ |
✅ |
✅ |
Export own data |
❌ |
✅ |
✅ |
✅ |
Export all notebook data |
❌ |
❌ |
✅ |
✅ |
Manage invites and access |
❌ |
❌ |
✅ |
✅ |
Manage administrators |
❌ |
❌ |
❌ |
✅ |
Delete notebook |
❌ |
❌ |
❌ |
✅ |
Action |
Member (Contributor) |
Member (Creator) |
Manager |
Administrator |
|---|---|---|---|---|
View team details |
✅ |
✅ |
✅ |
✅ |
View team templates |
✅ |
✅ |
✅ |
✅ |
Read/write/edit records in team notebooks |
✅ |
❌ |
✅ |
✅ |
Create notebooks in team |
❌ |
✅ |
✅ |
✅ |
Create templates in team |
❌ |
❌ |
✅ |
✅ |
Update team details |
❌ |
❌ |
✅ |
✅ |
Add/remove team members |
❌ |
❌ |
✅ |
✅ |
Manage member invites |
❌ |
❌ |
✅ |
✅ |
Act as notebook manager (virtual role) |
❌ |
❌ |
✅ |
✅ |
Add/remove team managers |
❌ |
❌ |
❌ |
✅ |
Act as notebook/template administrator |
❌ |
❌ |
❌ |
✅ |
⚠️ Note: Team Member (Creator) can create notebooks but does NOT automatically get access to existing team notebooks. This is by design for teaching environments where students create isolated notebooks.
Possible causes:
Not a member of the team that owns the notebook
Team role is Team Member (Creator) — doesn’t grant automatic access
Not directly invited to the notebook
Solution: Check team membership and role. Add direct notebook access via Invites tab if needed.
Cause: Missing Manager or Administrator role on the notebook.
Solution: Have a notebook Administrator invite you with Manager or Administrator role.
Cause: Missing Team Manager or Team Administrator role.
Solution: Have a Team Administrator elevate your team role.
Cause: Only GENERAL_ADMIN can assign Team Administrator roles.
Solution: Contact your system administrator.
Cause: User may have both direct and virtual (team-based) roles.
Solution: Check both:
Direct notebook roles (Notebook → Users tab)
Team membership (Team → Users tab)
Remove from both locations if needed.
Note: The Notebook Users tab only displays roles — you cannot edit them there.
Solution: Remove the user (trash icon), then re-invite via the Invites tab with the new role.
Quickstart Guide — Creating notebooks and collecting data
Guide Version: 1.4 Last Updated: 2026-01-19